Traverse Global v11.2 - Service Repair
Requirements Planner
The Requirements Planner function supports the generation of requisitions, purchase orders, order requests, production orders, and work orders, and can use vendor methods to determine a vendor for which purchase transactions are created.
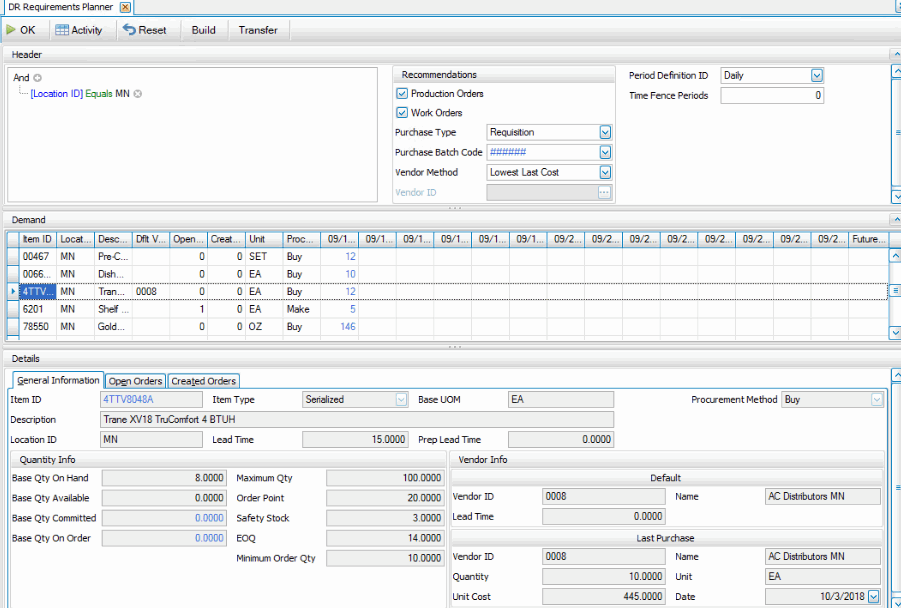
- Use the Data Filter in the Header section to select the range of filtering options or leave the filter blank to include all available data.
- The Production Orders and Work Orders check boxes are marked by default and are read-only.
- Select a Purchase Type from the drop-down list.
- When the Purchase Type is 'Purchase Order' or 'Order Request', select a Purchase Batch Code from the drop-down list.
- Select a Vendor Method from the drop-down list. See the Vendor Method topic for additional details.
- When Vendor Method is 'Specific Vendor', select a Vendor ID from the drop-down list.
- Select a Period Definition ID from the drop-down list.
- Accept or edit the Time Fence Periods.
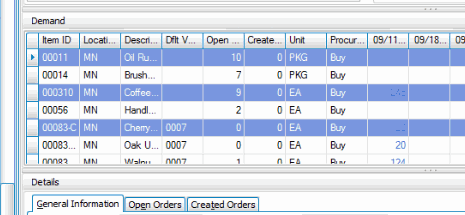
- Use the Build button to load Demand/Supply data based on the filter criteria. This will fill the Demand section with demand/supply quantities for the IN items that meet the filter criteria. Items are in rows, the period definition segments are in columns. You cannot add or delete records from the Demand section.
- Change the Procurement Method, as necessary, to generate a purchase transaction (buy) instead of a production order (make) for the selected item.
Create Orders from the Generate Orders screen -- Demand Section
If you right-click in the Demand section on a quantity in a date column, you will open a context menu with options to create transactions directly from the screen. If you double-click on a quantity in a column, the Item Activity View for that item opens.
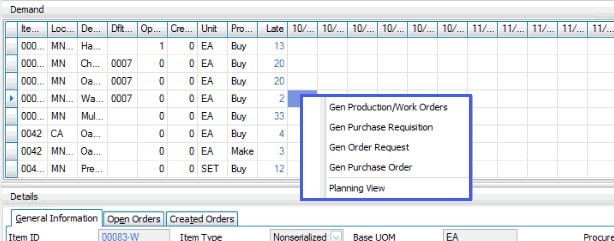
When you select an order type option from the context menu, you will see a Recommendations screen with a list of suggested transactions of the type you chose in the context menu, or you can open the Planning View for the selected item.
You can select multiple items by holding the Ctrl key and clicking on each item, or by holding the Shift key and clicking on the first item to select and then the last item, so all items in-between are selected. With items selected, right-click on a selection and choose a transaction option.
If there is demand on multiple dates in the demand grid, or if you select multiple items at once, you can combine information for purchase transactions. When you select an item that has demand on multiple dates and select a purchase transaction option from the right-click menu, the Generate pop-up dialog box appears.
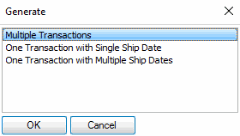
Options are:
- Multiple Transactions: Each demand date has a separate transaction
- One Transaction with Single Ship Date: The demand from all dates is combined into one transaction with one ship date
- One Transaction with Multiple Ship Dates: The demand from all dates is combined into one transaction with multiple ship dates
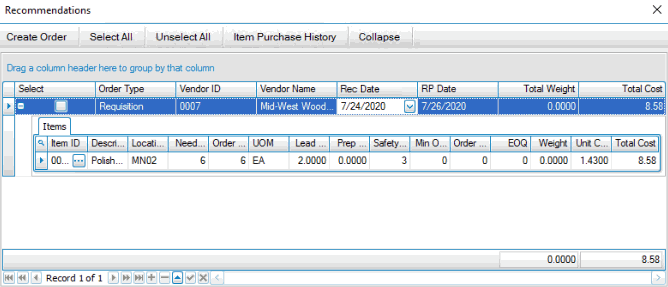
The Recommendations screen will suggest ordering items on one or more purchase transactions, depending on the option you choose and taking into account the vendor method selected in the header.
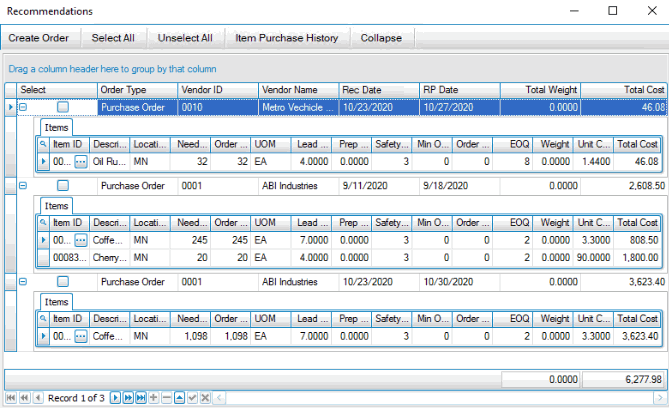
You can select a transaction and use the Append button to add other items to the transaction.
When the Order Type is 'Requisition', 'Purchase Order', or 'Purchase Request', you can edit the Unit Cost for an item.
Use the Item Purchase History button on the Recommendations screen to view the PO Item Purchase History View for the selected item.
You can change the Vendor ID, and Rec Date on the order line. Click on the expand button to view the line items on the order. You can change the Order Qty on the line item. If you want to add additional lines to the order, add lines as you normally would using the Append button.
To generate an order transaction, mark the Select check box for each transaction you want to generate. Use the Select All and Unselect All buttons to mark or clear all check boxes.
Use the Create Order button to create order transactions for the selected order(s).
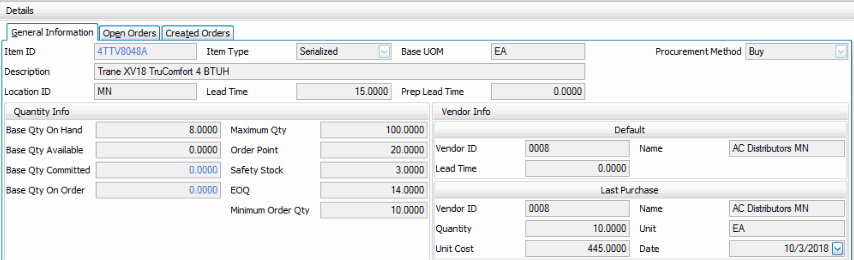
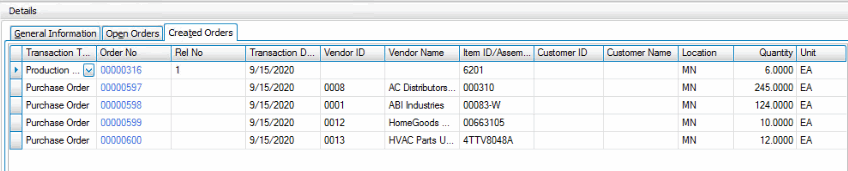
Details section
When you select an item record in the Demand section, the three tabs in the Details section will display information about that item. All tabs in the Detail section are read-only.
The General Information tab will show inventory information for the item, including current quantity and vendor information.
The Open Orders tab displays the open orders for that item. You can drill down to the order using the link in the Order Number column.

When you create an order using the Recommendations screen, the Created Orders tab will display the order(s) you created during the session.
Transfer items
Use the Transfer button on the toolbar if you want to transfer items from one location to another instead of creating a purchase transaction.
To transfer an item:
- Select a single demand quantity in the Demand section.
- Click Transfer on the toolbar.
- The Transfer screen opens and shows the inventory quantities and locations for the item.
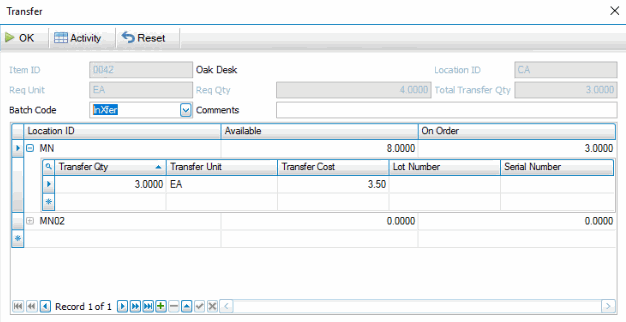
- Select a Batch Code for the transfer.
- Expand the item detail for a location to enter transfer information.
- Enter a Transfer Qty.
- Accept or select a Transfer Unit of measure.
- If there is a cost associated with the transfer, enter it in the Transfer Cost column.
- If the item is lot-controlled and/or serialized, enter/select the lot number and/or serial number to transfer in the appropriate field(s).
- If you are transferring items from multiple lots, or have multiple serial numbers you are transferring, use the Append button to add lines to accommodate multiple lots and/or serial numbers.
- Click OK to generate the transfer.