Traverse Global v11.2 - Service Repair
Requirements Planning Process Overview
Managing inventory is like balancing a seesaw—too little inventory and you’re unable to fill orders in a timely manner, which could lead to customer dissatisfaction. Too much inventory and items sit on shelves, adding to your costs. You’d be able to solve these inventory problems, if only you could see them coming.
The Requirements Planning (RP) application for Traverse helps you balance future supply with demand so that you can solve inventory problems before they happen. Requirements Planning helps you plan accurately so that you can anticipate surplus or shortage, determine purchase or production requirements, manage inventory to retain less product on the shelves, increase customer satisfaction via better service, and institute cost-effective buying plans.
RP requires the Traverse Inventory application, and optionally interfaces with the Purchase Order, Sales Order, Project Costing, MFG Production, and Bills of Material/Kitting. You get the best use (and most accurate forecasting) when you interface RP with all available applications. When you interface RP with Purchase Order, Sales Order, Project Costing, and MFG Production or Bills of Material/Kitting, RP can access the purchase, sales, project usage, and work order information in those applications to accurately forecast inventory needs. In addition, RP can automatically enter purchase requisitions and work orders into Purchase Order and MFG Production or Bills of Material/Kitting when inventory shortages are identified. Alternately, you can use RP’s planning reports to manually enter purchase requisitions and work orders.
Definitions
- Period: the time frame that Requirements Planning considers at one time. If a period is 'Weekly', RP will look at one week.
- Period Definition: A period definition is the time frame the system considers when calculating demand or supply quantities. The period definition establishes the number of periods into the future the system will plan for. For example, a period definition of 10 weekly periods means the system will look at demand/supply requirements from now through 10 weeks from now.
- Time Fence: A time fence is an artificial way to divide requirements into two sections based on time (time periods within the time fence and time periods after the time fence). The number you enter is the number of periods you want to include within the time fence. Time fences are important when you’re looking at orders vs. forecasts. The system uses actual orders vs. forecasts within the time fence and the greater of the two beyond the time fence. Imagine that the sales forecast for next March is 300 units, while actual sales are 275. If March lies within the time fence, the system uses the actual sales number of 275 on reports. If March is beyond the time fence, the system assumes 300 (the greater of the two) to be correct.
For example, you might set the Demand Time Fence Periods to 3, and define 8 periods in total. This means that the first three periods in the period definition are included in the time fence (and actual numbers are used) while the remaining five periods are outside the fence (and the greater of forecasts vs. actual is used). - Procurement Method: For an inventory item, the procurement method is the manner in which you acquire the item to put into inventory. If the procurement method is 'make', the item exists on a bill of material (MFG BOM or BM). When a MFG Production Order or BM Work Order is created for a 'make' item, it is considered 'Demand'. If the procurement method is 'buy', the item is a component you purchase from a vendor, and is considered 'Supply', since components are required to build 'make' items. If the inventory item is a service or kitted item for which quantity is not tracked, the procurement method is 'none'.
- Single-Pass mode: Determined by the RP Period Definition Horizon, Single-Pass mode allows the system to calculate the demand/supply through multiple layers in one pass. In multi-pass (normal) mode, you would generate RP data and then create MFG production orders/BM work orders for the forecast demand. Then you would generate RP data again to create purchase transactions to satisfy the forecast demand from those production orders/work orders. If a stocked subassembly is used, another RP data generation cycle is needed to create purchase transactions to satisfy demand.
In Single-Pass mode, the system will create virtual production orders/work orders to calculate the supply requirements, then create virtual purchase transactions to satisfy the supply requirements, and repeat the process as necessary in one pass, using the period definition horizon as the time frame.
- Forecasts: The Forecasts function allows you to manually enter demand/supply quantities for a period definition. This can be a way to consolidate regular or routine demand/supply into one place. For instance, if you have a set of items that are always ordered or made at the same time, you can create a forecast that includes those items. Requirements Planning includes forecasts when it generates data.
Setup
Requirements planning uses the demand and supply that exists in the system to calculate what items should be made or bought and when. To facilitate the calculations, there are some items to set up before you start generating requirements planning data.
- Create Period Definitions.
- Determine whether you want to utilize Single-pass mode (RP Business Rules).
- Create Forecasts as needed.
- Ensure all items have an appropriate Procurement Method assigned. The system will, by default, assign a method of 'Make' to items for which there is a MFG BOM or BM BOM, and a method of 'Buy' to items that do not have a BOM. Kitted and service items will have a method of 'None'.
Process Flow
Once you have period definitions and forecasts set up, you can utilize the requirements planning processes.
Requirements planning data is stored in an RP data table. Every time you run the Generate RP Data function, this table is cleared and reloaded. The other RP functions work with the data in this table.
See the main topics in the Help for details on each function.
First, on the RP Processing menu, open and run the Generate RP Data function. This will clear the RP data tables and reload them with updated data. You can use the Standard RP Report, Daily Detail RP Report, and the Component Pegging Report to view the data in the RP data table.
On the RP Processing menu, open the Requirements Planner. This screen is the primary way you interface with the RP data. This allows you to create purchase transactions, MFG production orders, BM work orders, or location transfers to ensure you have required inventory when you need it.
Use the Requirements Planner screen to view demand, open orders, and to create orders or location transfers to satisfy the demand. You can filter the RP data to work with specific subsets, such as items with a procurement method of 'make', items at a specific inventory location, or items assigned to a particular buyer/planner. You can also choose the types of recommendations the system will offer, such as a certain purchase type or select vendor method. You can also choose the period definition and time fence periods you want to work with.
Requirements Planner Header section
In the Header section of the Requirements Planner screen, select criteria for the RP data, or leave blank to see all data in the RP data tables.
In the Recommendations panel of the Header, Production Orders and Work Orders are marked and cannot be changed. You can choose the Purchase Type, select a batch code for any purchase transactions you generate, and select a Vendor Method.
Select a Period Definition for the data from the RP data tables, and enter a Time Fence Period, if desired.

Click Build to show the demand that meets the criteria selected in the Header.
Demand section
Once you click Build, the Demand section will show records from the RP data tables. A date column is created for each period of the selected period definition. The demand quantities of each item for each period are shown. You can see details of a quantity by double-clicking the link (blue numbers). This will open the Item Activity View for the item.

Details section
As each record in the Demand section is selected, the Details section will show general information, open orders, and orders created through the Requirements Planner this session. All tabs in the Details section are read-only.
You can drill through to additional details using the blue links to open view-only screens or, if you have permission, maintenance screens.
General Information tab
The General Information tab shows inventory information for the item.

Open Orders tab
The Open Orders tab shows current orders open for the item.

Created Orders
The Created Orders tab shows all orders created during the current session.

You can generate orders for demand items directly from the Requirements Planner screen.
Right-click in a date column for a record to open the context menu, where you will have options to use to fulfill the demand.
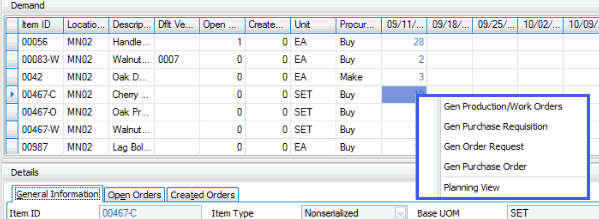
Generate Production/Work Orders
If the item is a 'Make' item, select Gen Production/Work Orders from the context menu. The Recommendations screen opens and recommends a production order.
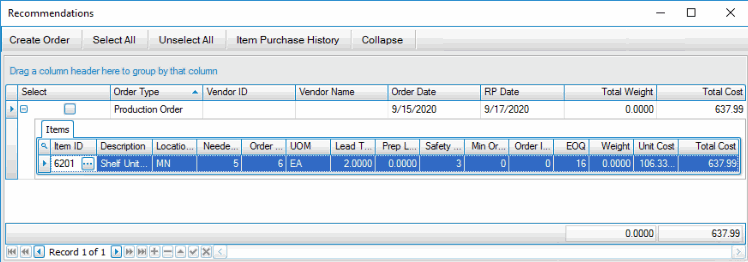
You can edit the Order Qty. All other fields are read-only.
Mark the Select check box for the order(s) you want to generate, then click Create Order. The order is generated, and the activity log opens when the process is complete.
Once an order is generated, the demand quantity for that date is removed from the Demand section.
Generate Purchase Transactions
If the item is a 'Buy' item, select one of the purchase transactions listed in the context menu. The option you choose determines the type of order the system will generate. The Recommendations screen opens and recommends an order of the type you selected in the context menu.
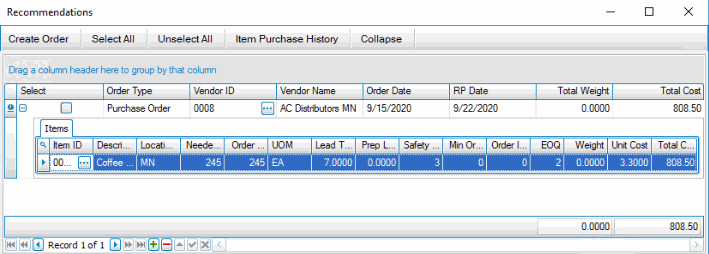
If there is no default vendor listed, you must select a vendor from the Vendor ID drop-down list.
You can edit the Order Qty and the UOM, as applicable.
You can also add items to the order using the Append button.
Mark the Select check box for the order(s) you want to generate, or use the Select All button to mark all check boxes (Unselect All to clear all check boxes), then click Create Order. The order is generated, and the activity log opens when the process is complete.
Once an order is generated, the demand quantity for that date is removed from the Demand section.
Generate Order Transactions for multiple items
You can select multiple items at once from the Demand grid by holding the Ctrl key down while clicking on the demand value in a date column.
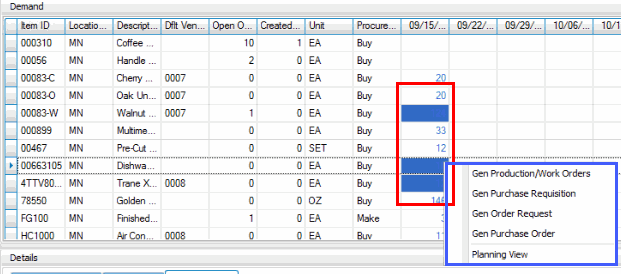
When you choose the type of order to generate, the Recommendations screen opens with order recommendations.
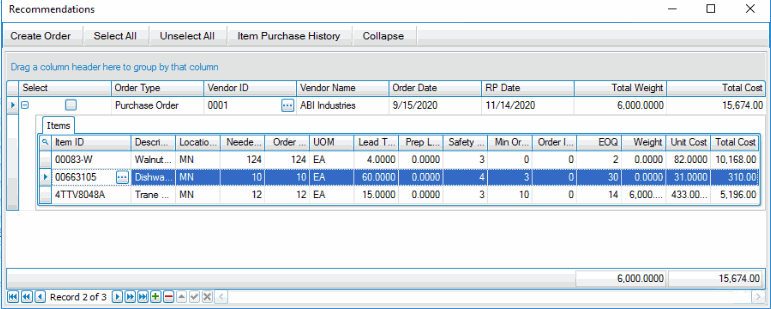
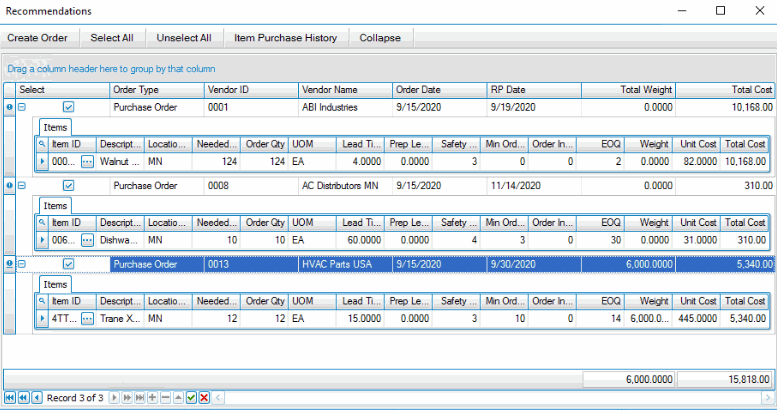
Depending on the Vendor Method setting in the Header, as well as item purchase history, the system will recommend one or more orders:
Note: You may have to select a vendor for an order.
- Items from a single vendor when all items have been purchased from the vendor in the past
- Items purchased on separate orders from multiple vendors
- You can choose to generate multiple transactions, one transaction with one ship date, or one transaction with multiple ship dates
The Generate dialog box opens with options
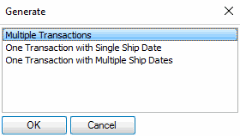
Choose the best option for your circumstance. Click OK to open the Recommendations screen.
If there is no default vendor listed, you must select a vendor from the Vendor ID drop-down list.
You can edit the Order Qty and the UOM, as applicable. You can also add items to the order using the Append button.
Mark the Select check box for the order(s) you want to generate, or use the Select All button to mark all check boxes (Unselect All to clear all check boxes), then click Create Order. The order is generated, and the activity log opens when the process is complete. Once an order is generated, the demand quantity for that date is removed from the Demand section.
Rather than holding the Ctrl key and clicking individual date column entries, you can select one or more item records at once by clicking on the row. The entire row will be highlighted. You can select multiple rows by holding the Ctrl key and clicking multiple rows.

Click OK on the toolbar. You may get an opportunity to select the type of transactions to generate: multiple transactions, one transaction with single ship date, or one transaction with multiple ship dates. The Recommendations screen will open with suggested orders to satisfy the demand for the items you selected.
The Purchase Type will be the type you selected in the Header. You may be able to change vendors. You can edit the order quantities and units of measure, as well as add items to orders using the Append button at the bottom of the screen.
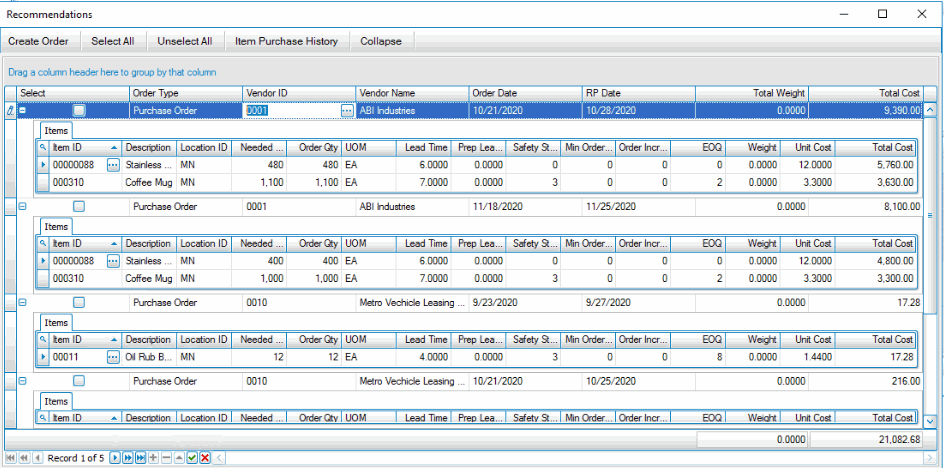
Mark the Select check box for the order(s) you want to generate, or use the Select All button to mark all check boxes (Unselect All to clear all check boxes), then click Create Order. The order is generated, and the activity log opens when the process is complete. Once an order is generated, the demand quantity for that date is removed from the Demand section.
The activity log will appear when the process is complete.
Select Planning View from the context menu to open the Planning View screen for the selected item. This allows you to review the RP Data for the item.
You can create location transfers for items directly from the Requirements Planner screen.
Select a demand quantity in a date column and click Transfer on the toolbar to open the Transfer screen.
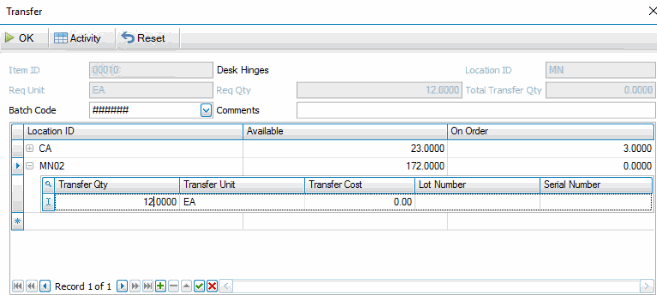
The grid will show the available quantities in each location.
Select a Batch Code. Enter any Comments for the transfer.
Click the plus sign to expand the Location ID record for the location from which you want to transfer the item(s).
Enter a Transfer Qty, Transfer Unit (of Measure), Transfer Cost, Lot Number, and/or Serial Number, as applicable.
You can use the Append button to add additional quantities to the transfer, as needed.
Click OK to complete the process. The activity log will display.