Traverse Global v11.2 - Service Repair
Employees - Service Repair
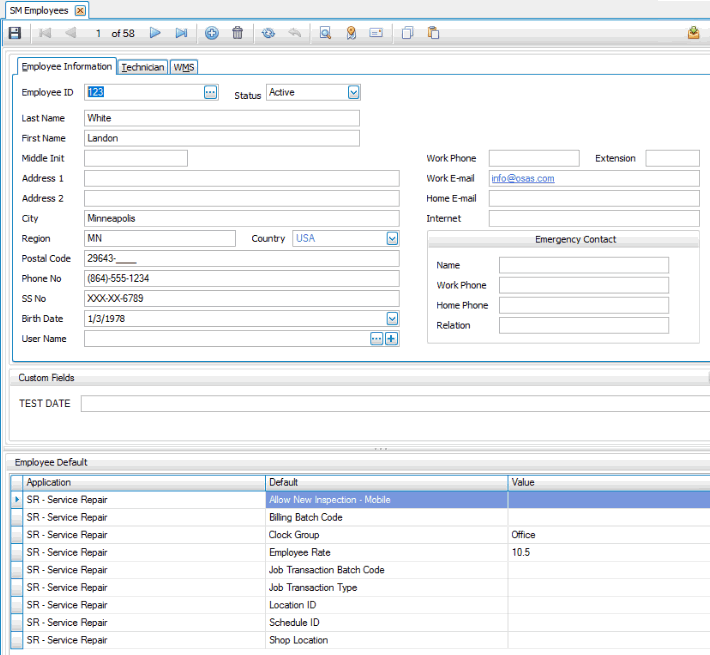
Use the Employees function to set up employee information such as name, address, social security number, birth date, phone, email address, and emergency contact if Payroll is not installed. If Payroll is installed, use the Employee Information function on the Payroll Setup and Maintenance menu.
The Employees screen also allows you to set up mobile profiles for users of Mobile WMS, as well as the mobile apps associated with Field Service and Service Repair.
Note: Please use SM User Defaults - Admin to enter/edit default values for employees who use Mobile Service Repair. New Employee defaults fields will be displayed but should not be edited here as it is not yet supported.
NOTE: This application cannot be used in lieu of a payroll application. It will not store any history, calculate taxes, or print checks. It is reference information only.
Creating an Employee Record
Employee Information tab
- Click the New button, on the toolbar, to open a blank Employee record.
- Enter an Employee ID.
- Select a Status for the employee.
- Enter the employee's information in the remaining fields, as applicable.

In the User Name field, select a SM User to associate with the employee. Use the Browse button to view the drop-down list, or click the Plus button to open the SM Users function and add a new user.
- In the Employee Default section, you can set the listed default values for the user, as applicable. For example, if you want the user to be able to create a new inspection for a job in Mobile Service Repair, set the default value for Allow New Inspection - Mobile to 'Yes'.
Note: Please use SM User Defaults-Admin to enter/edit values. New Employee defaults fields will be displayed but should not be edited here as it is not yet supported.
- Click the Save button, on the toolbar, to save the new employee record.
Technician tab
This tab is available only if you have the Service Director application installed.
You can create a technician ID for the employee on the Technician tab. This tab also allows you to create a crew.
To add a new technician:
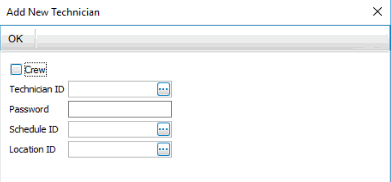
- Use the New button on the Technician tab toolbar to open the Add New Technician window.

- Clear the Crew check box.
- The employee ID for the current employee appears in the Technician ID drop-down field.
- Enter a login Password for the technician. The technician will use this password when logging into the mobile technician application.
- Select a Schedule ID from the drop-down list.
- Select a Location ID from the drop-down list.
- Click OK to add the employee to the list of technicians.
- Save your changes.
Note: The Employee Default section at the bottom of the screen is intended to support employee defaults that may be added in vertical-aligned implementations of Traverse, such as Service Repair or Field Service. The Employee Default section has no use in base Traverse at this time.
 To add a crew
- Mark the Crew check box.
- Enter a crew name in the Technician ID field.
- There is no login password for a crew, so that field is disabled.
- Select a Schedule ID from the drop-down list.
- Select a Location ID from the drop-down list.
- Click OK to add the crew you created to the list of technicians.
- Add members to the crew by selecting technicians from the Technician ID field on the Crew Members tab.

- Save your changes.
- Once the technician ID is created for the employee, add one or more Labor Codes on the Labor Code tab
On the Labor Code tab, use the Append button to create an empty record, or click in a blank line.

- Select a Labor Code, as applicable. The Labor Code Description will display.
- Select a Skill Level, as applicable. The Skill Level Description will display.
- Save your changes.
NOTE: You will still have to grant SD technician permissions to the employee using the SD Technicians maintenance screen.
WMS tab
This tab is available only if you have the WMS application installed.
You can create a WMS user for the employee on the WMS tab.
To add the employee as a new WMS user:
- Use the New button on the WMS tab toolbar to open the Add New User window.

- The employee ID for the current employee appears in the User ID drop-down field.
- Select a Location ID from the drop-down list.
- Click OK to add the employee to the list of WMS users.
- Save your changes.
NOTE: You will still have to grant WMS user permissions to the employee using the WM Users maintenance screen.
Editing an Employee Record
- Select an employee record to edit from the Employee ID field.
- Edit the fields as necessary.
- Click the Save button, on the toolbar, to save any changes made to the recurring entry.
Deleting an Employee Record
- Select an employee record to delete from the Employee ID field.
- Click the Delete button, on the toolbar, to delete the selected employee record.
- Click Yes at the "Are you sure you want to delete selected record(s)?" prompt.