Traverse Global v11.2 - Service Repair
Material Charges
Use the Material Charges function to capture materials used for a job. You can use the Material Charges function to add the material charges to the job transaction. You can also use the Material Charge function to credit materials back to the job.
You can only add material charges or credit to an approved or estimate job that is currently open.
To add or edit a material charge for a job transaction:
- Select a job from the Job ID drop-down list. Only approved and estimate jobs that are currently open will be available.
- Click the New button, on the toolbar, to add a new detail line to the material charges.
- Use the Save button, on the toolbar, to save your changes.
Use the Column Chooser as necessary to add columns to the screen. If your technicians leave an item at the work site, use the Column Chooser to add the Left Onsite column, and mark the check box for the item.
Click a command button on the toolbar to:
| Select | To |
|---|---|
| Ser No Entry | Add serialized items. |
| Detail | Add additional information for the material, including lot numbers or serial numbers, if applicable. See Detail for more information. This is also where you select bin and container information for material items you add to a job transaction. |
| Quick Entry | Select multiple material items at once to add to a job transaction. See Quick Entry for more information. |
| Credit | Credit materials that have already been charged to the job. See Credit for more information. |
| Write | Add the line items to the Job Transaction detail. The job transaction must be Open to write the Material Charge detail to the job. Clicking the Write button will adjust the inventory for the selected item as follows: If the Line Type is Material Charge, the Qty On Hand for the item will be decreased by the quantity of the line. If the item is serialized, the status of the serialized item will change from Available to Sold. If the Line Type is Material Credit, the Qty On Hand for the item will be increased by the quantity of the line. If the item is serialized, the status of the serialized item will change from Sold to Available. |
If you want to delete a material charge, select the material charge record, then use the Delete button, on the toolbar, to delete the selected record. Click Yes at the "Are you sure you want to delete selected record(s)?" prompt.
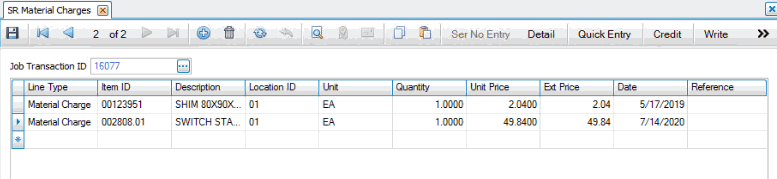
- Select a Line Type for the material charge.
- Material Charge will remove the item from Inventory and apply it to the job.
- Material Credit will remove the item from the job and increase the Inventory quantity of the item. If you select Material Credit for a non-inventory item, the detail line will have a negative price.
- Select an inventory item from the Item ID drop-down list, or enter a non-inventory item.
- The Description field will display the description from the inventory file if the item is an inventory item; otherwise, enter a description for a non-inventory item.
- Accept the location in the Location ID column, or select a different location from the drop-down list.
- Select the Unit of measure for an inventory item from the drop-down list, or enter the unit of measure if the item is a non-inventory item.
- Enter the quantity of the items required in the Quantity field.
- The Unit Price from Inventory or standard pricing will appear if the item is an inventory item. If the unit price is 0, or the item is a non-inventory item, then Unit Price = Unit Cost * Material Multiplier (in the Department setup).
You may override the Unit Price as necessary.
- Ext Price = Quantity * Unit Price
- The current date will display in the Date field. You may change the date, if necessary.
- Enter a value, if necessary, into the Reference field.
- Use the Save button on the toolbar to save your changes.
- Use the Write button to write the charges to the SR job. The materials will be displayed on the Detail tab of the SR job transaction and removed from the Material Charges screen.
Use the Toggle button ( ) to switch between Grid (Summary) view and Field (Detail) view.
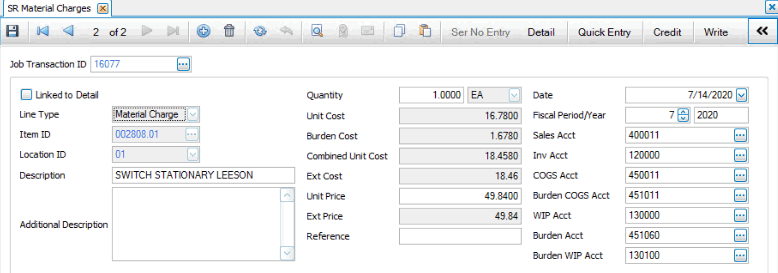
- Select a Line Type for the material charge.
- Material Charge will remove the item from Inventory and apply it to the job.
- Material Credit will remove the item from the job and increase the Inventory quantity of the item. If you select Material Credit for a non-inventory item, the detail line will have a negative price.
- Select an inventory item from the Item ID drop-down list, or enter a non-inventory item.
- Accept the location in the Location ID column, or select a different location from the drop-down list.
- The Description field will display the description from the Inventory file if the item is an inventory item; otherwise, enter a description for a non-inventory item.
- The Additional Description will appear if the item is an inventory item.
- Enter the quantity of the items required in the Quantity field.
- Select the Unit of measure for an inventory item from the drop-down list, or enter the unit of measure if the item is a non-inventory item.
- If the item is an inventory item, the Unit Cost will default from the Inventory Unit Cost. If the item is a non-inventory item, enter the unit cost into the Unit Cost field.
- The Burden Cost will be calculated from the Burden % in the Department setup.
- Combined Unit Cost = Unit Cost + Burden Cost
- Ext Cost = Quantity * Combined Unit Cost
- The Unit Price from Inventory or standard pricing will appear if the item is an inventory item. If the unit price is 0, or the item is a non-inventory item, then Unit Price = Unit Cost * Material Multiplier (in the Department setup).
You may override the Unit Price as necessary.
- Ext Price = Quantity * Unit Price
- Enter a value, if necessary, into the Reference field.
- The current date will display in the Date field. You may change the date, if necessary.
- The Fiscal Period and Year will default from the Date and Period conversion table. You may change the date, if necessary.
- The inventory account will default from the inventory item's Account Code. If the item is a non-inventory item, the accounts will default from Accounts Receivable as listed in the Business Rules.
The sales and cost accounts will come from the distribution code accounts.
You can change accounts as necessary.
- Use the Save button on the toolbar to save your changes.
- Use the Write button to write the charges to the SR job. The materials will be displayed on the Detail tab of the SR job transaction and removed from the Material Charges screen.
When you write the details to the job transaction:
- If the line type is 'Material Charge', the Qty on Hand for the item will be decreased by the quantity of the line. If the item is serialized, the status of the serialized item will change from 'Available' to 'Sold'.
- If the line type is 'Material Credit', the Qty on Hand for the item will increase by the quantity of the line. If the item is serialized, the status of the serialized item will change from 'Sold' to 'Available'.
Once the charges are written to the job transaction, they are removed from the Material Charges screen.